
NORTHSTAR BIKE PARK
North Lake Tahoe, CA
Staging
The handiman spots are located in separate parking lot (See map). The bathrooms are not located close. There is an accessible bathroom in the gondola building ion you can wait. Yikes! Otherwise, you’ll need to roll into the village.
There are closer handiman spots right behind Northstar Sports (see map) if you can manage it somehow. There is gate and it appears to be private and/or paid parking. I’m not sure. If you are able to park here, you will be MUCH closer, but there is still a good hill between you and the gondola.
To ride the gondola, you will need your wheelchair. They have a chair there, but it is an old hospital chair with no footrests. Someone will need to hold your legs for you, it does not fit in the gondola and getting from the chair to the gondola seat is too big of transfer. Unless you are semi-ambulatory or an orangutang, bring your own chair. I prefer having my own chair for going to the bathroom between runs anyway (pun intended).
Now, getting to the gondola is a bit of a trek. The village is full of steps and it is a roundabout route to the gondola, so use the map here to find your way. There is also a steep hill involved so getting yourself AND your bike up there may present an issue. I like to use the throttle and pull myself with my bike while sitting in my chair. Be careful of cracks in the asphalt. I had a yard sale in the street. If you do not have this option, you may need to get help to get your bike to where you need to be.
Once at the gondola, you will need to access the building through the exit door. Go talk to the lifties first and they should gladly help you. They did for me. Bring a couple bungie cords or straps to hold your bike on the cargo car. The lift operators will not have these and you will need to provide your own. Preferably choose something quick and easy to deal with. Cam straps and ratchet straps tend to be a little high maintenance and may hold the line up.
Don’t forget to go to the bathroom before loading. I always do! There is so much going on and so much commotion usually. When you are ready, have the lifties slow or stop the gondola, whatever you are comfortable with. Wheelie your front wheels into the car and have your friend or one of the lifties lift you up into it. They loaded my bike on the cargo car behind us, but I would prefer to have it loaded in front. That way its waiting for me. I am not sure if this is even possible. Maybe loading behind is just how its done there. If you have the choice. Have your bike loaded in front. Thats my preference.
Once to the the top, find a quiet spot out of the way to transfer into your bike. Once settled, have the lifties send your chair down to the bottom. Make sure to grab the bungees. You will need them if you plan on riding the chairlift to the top. Lots to think about.
Description
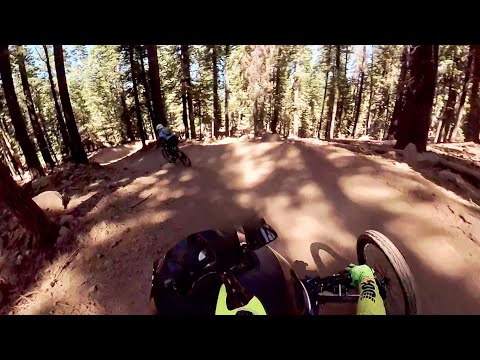
The gondola takes you to mid-mountain and there are two trails i did from there that are super fun and totally adaptive friendly. Take Mineshaft to Liftline and you will have a blast. I could happily lap these two trails all day. There is a dilemma at the end of Mineshaft though. Two trees and a stump create too narrow of a trail to pass through. Advanced riders can do it, but if you take the left fork (see map) towards the end of Mineshaft, you’ll be able to get through completely solo and probably have more fun. Watch the video to see it for yourself.
To access the top of the mountain, you will need to ride the chairlift. Now, I had an interesting experience loading this lift. Everyone is different and another rider who prefers a completely opposite load procedure had been riding the day before. I showed up and the crew pretty much had a meltdown. The other rider could stand up and take steps. Thats a big difference and they were unprepared for me. Honestly, I am unsure of the best way to load this lift. I would need more experience with it to comment. I opted out of a third run because loading the first two times was so dramatic. If you have your bungees and a patient heart, I am sure things will work out fine.
From the top, the only run I did was Livewire. This is a fast jump line but everything is rollable. I had a to of fun on this trail. It is plenty wide, but i had to rate it aMTB2 because of the nature of the run. It is an advanced downhill trail and beginners should not attempt it. The biggest concerns are probably off-camber berms and backing up traffic. Riders go fast so be smart. That said, most adaptive riders should be able to rock this trail with little to no issue. Linking it up with Mineshaft and Liftline down to the bottom would be the run of a lifetime!
Trails
I know this place has MUCH more to offer, but I had limited time and was only able to ride three trails the day i was there. I am sure there are others that are adaptive friendly, but I just have not ridden them yet. Hopefully i will get back there soon and be able to add more.
Mineshaft (aMTB1) - Fun and flowy. Take the left fork near the junction of Lifeline to avoid needing to get help through some narrow trees. See video below.
Liftline (aMTB1) - Fun and flowy. No obstacles.
Livewire (aMTB1) - This trail is plenty wide enough, but it is an expert only black DH trail with features. It is fast and all the jumps are rollable.
Videos

Mineshaft 360
Liftline 360
